Last week I showed a customer-supplied AI file going from a mess to print-ready and what the tools cost. This is every step, in the order I did it in the video, with the terms defined the first time they show up. °FAI: AI Art Cleanup, Step by Step.
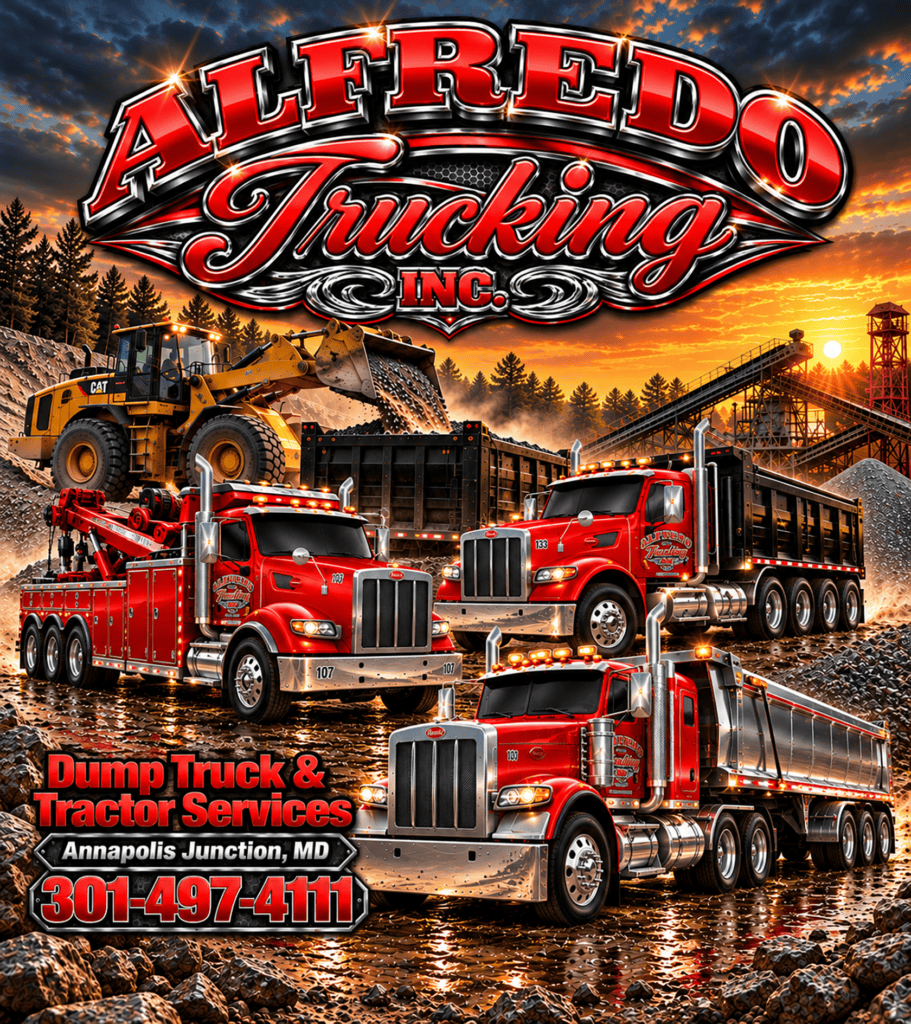
Before you touch it.
- Audit the file. Look for what’s wrong. Resolution (the pixel count — this one was 1618 × 1872, low for print). Junk: shapes the model invented that aren’t anything.
Hand off the text and logos.
- Send the fixes to ChatGPT. Upload the image. Ask for specific, checkable changes. Make the numbers read 107, 133, 101, same size as the original. Identify the badge on the grille (Peterbilt) and redraw it. Match the door logos to the headline logo. One request per round. Check the result.
- Ask Claude for masks while ChatGPT works. A mask is a black-and-white image the same size as the art. Upload the file and list every part: logo, each truck, red paint, chrome, wheels, tires, grills, windshields, trees, rocks, the text block. Specify Python, PNG output, hard edges with one to two pixels of anti-alias (a slight softening so the edge doesn’t look jagged), grouped per truck. End with: ask me questions before you proceed to get what you want. Pick the model and the effort level (I used Fable on high, more reasoning, slower).
- Answer its questions. Connect a folder. It asked four: format, edges, grouping, delivery. Connecting a folder lets Claude write the masks straight to your computer. It won’t resume on its own after you connect. Tell it to go.
- Composite the ChatGPT logos onto the original. In Photoshop, put the ChatGPT version on a layer above the original. Select the logos. Select > Modify > Expand (grow the selection five pixels outward). Inverse (flip the selection to everything else). Delete. You keep only the improved logos. Nothing else from ChatGPT’s version touches the file. Feather (a soft fade on the selection edge).
Upscale without wrecking it.
- Skip Photoshop’s generative upscale. Upscaling means adding pixels to make the image bigger. Generative upscale (the Firefly-based one inside Photoshop and the Topaz one inside PS) invents detail. On AI art, it turns noise into wavy, interlocked patterning. Don’t use it on this kind of file.
- Open Topaz Gigapixel as its own program. Not the Photoshop plug-in. Use the Recover V2 model (the mode built for low-quality sources). Use the preview square to check the areas you already know are bad: gravel, lettering. Small steps (2× at a time, repeated) beat one 4× jump. I’ve run 35 passes on a single image. – It was a photograph of a T-shirt that was printed 30 years ago and washed 1,000 times. It was a line drawing of white ink on a dark shirt, so it had cracked a whole bunch. I used Topaz to repair it back to its original state, and they couldn’t tell the difference. That’s why I did it that many times.
- Run only the Lightness channel. Convert to Lab mode (three channels: L is lightness, A is green-to-red, B is blue-to-yellow — color is separated from brightness). A channel is one grayscale layer of the color data. Export the L channel alone, run it through Topaz, paste it back into L. The upscaler AI only has to solve detail, not detail and color at once, so it makes fewer wrong guesses. Lab to RGB and back is safe. Lab to CMYK and back is safe. RGB to CMYK is not, so just keep that in mind. That’s why I label the file RGB even though it’s in Lab, because then I know I can go back to RGB.
-
Remove the JPEG noise. JPEG artifacts are the blocky, speckled halos compression leaves around edges. Switch to RGB (Neural Filters only run in RGB). Neural Filters > JPEG Artifacts Removal, set to High. Lab to RGB and back is safe. RGB to CMYK and back is not — CMYK (the print color mode) has a smaller color range and throws colors away.
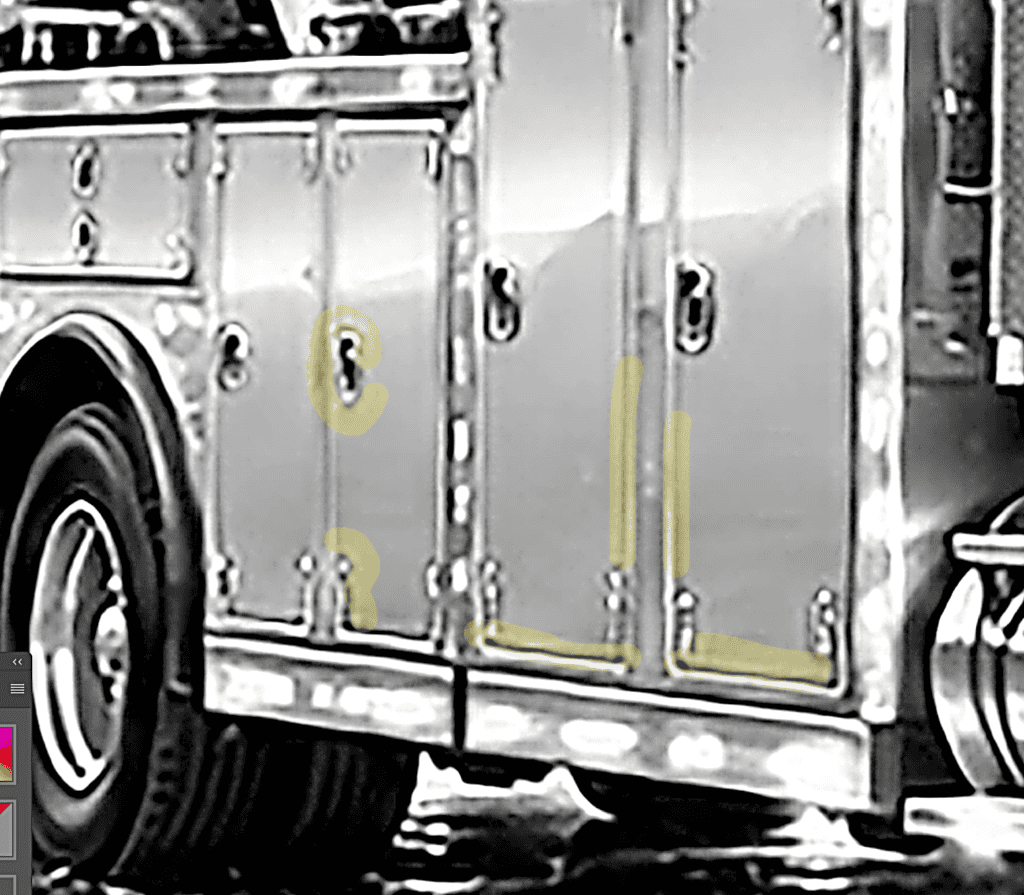 JPG NOISE HIGHLIGHTED IN YELLOW – it’s all over this image, but I just was trying to show you a little bit.
- Smooth the color channels. Back to Lab. On A and B: Gaussian Blur at 0.4 (a soft overall blur), then Noise > Median at 1 (replaces each pixel with the middle value of its neighbors — kills speckle without blurring edges). This keeps the colors from pulling apart from each other. You don’t want to see a huge change here when you do this. If anything, you want it to be almost invisible, but it will soften the colors so that, as you keep improving the image, the colors don’t pull apart.
- Try sharpening. Then back it out. Unsharp Mask (sharpens by raising edge contrast) on the L channel. It brought the noise back. I undid it. Not every step survives. Settings are 84, 3, and 1, but generally it might be too harsh.
- Second Topaz pass on the full RGB. Save as RGB PNG. Open in Gigapixel. Recover again. Now the gravel and the letters come through clean.
Clean it by hand.
- Remove the junk. Use the Remove tool (content-aware patching — free, no credits). Not Generative Fill (Firefly — burns credits). Do it on the upscaled file so you don’t add new noise.
- Rebuild the logos and numbers. Isolate the logo on its own layer, turn off everything underneath, then Select Subject (Photoshop’s AI selection. It works when the thing is alone, not when it’s buried). Run the pieces through Vectorizer AI (converts pixels to vector shapes — scalable, clean, no upscaling needed). Pull the real Peterbilt mark from Brands of the World. Rebuild the numbers in Illustrator or Corel.
- Check Claude’s masks. Mine came back after about 46 minutes. Mostly right. It missed the dark red edging, and the chrome mask picked up extras. Knock those out by hand. Next time, one mask per request.
- Stop. Removing is free, so it’s addictive. Get it to a quality the customer will approve. Then start separations (splitting the image into the individual ink colors that each get their own screen), using the masks.
What this really shows: none of this is new. Channel work, median blurs, rebuilding a logo from the real source, that’s thirty years of prepress. The AI tools slot into the parts that were always tedious. That’s what AI is good at. The judgment about what’s wrong, still has to come from someone who knows.
Same job. Fewer hours.
Tools used:
- ChatGPT (the first pass on numbers and logos)
- Claude (Fable, high effort — Python masks; drafted this article)
- Photoshop (Lab channels, Neural Filters, Remove tool, Select Subject, compositing)
- Topaz Gigapixel (standalone, Recover model)
- Vectorizer (pixels to vector)
- Brands of the World (the real logo, free)
- Illustrator / CorelDRAW (rebuilding the numbers)
Comments